
Patella & microgreens FAQ
Grow your own super greens all year round
Everything you were wondering about when it comes to Microgreen sprouting kit Patella Crescenda.
Got a valid question that's not on here?
Get in touch and we'll not only respond and add it to the list, but also award you with a €5,- discount on your next House of Thol order!
Frequently Asked Questions
About the Patella Crescenda
What's that name about?
Patella Crescenda is Latin and literally means 'growth dish', so even though it might sound fancy, it simply explains what you are looking at.
(We made sure to check this with two classical scholars)
The water level is too low, what should I do?
This is very easy to solve: just lift the glass reservoir a little bit and water will flow into the system.
Repeat this motion several times to make sure the water is back to the level you are looking for.
Incidentally, the seeds only need to be touching the water in the first few days of the germination process.
Once a root has formed, it simply seeks the moisture itself, and the water level can remain a bit lower.
In fact, once they are a little plant, the sprouts prefer keep their plant base dry and only extend their roots into the water.
Where can I buy the Patella Crescenda?
Well, here in the webshop, for starters.
If you prefer to pick up a set somewhere near you, check out our store locator to see where to find House of Thol points-of-sale.
Every now and then we take part in an exhibition or fair and are likely to bring the Patella sets with us.
Check out our Calendar to see what we have coming up.
Where is the Patella Crescenda made?
Patella sets consist of several parts that all come from different suppliers. We aim to source the parts from within Europe when we can.
-The cardboard boxes are made in the Netherlands.
-The terracotta dishes and bases are made in Portugal.
-The glass reservoirs are also made in Portugal from 80% recycled glass
-The stainless steel growth disks are made in Italy.
All parts are collected and packaged at the House of Thol headquarters in Overasselt.
How long does it take to ship the Patella Crescenda?
When you place an order in our webshop, our goal is to always have it out the door within 48 hours.
Orders placed on Friday and in the Weekends are dropped off at the post office the following Monday.
To give you an idea about the way we manage your webshop order: we usually start out our day with preparing the orders from the day before and add the orders coming in before lunch. Orders placed after 13:00 are usually sent out the next day.
Find more information about shipment and expected delivery times here.
How many seeds should i sow?
Less than you think!
We advice to lightly fill the sowing circles on the growth disks, give your seeds a little room to breath and develop.
Many seeds swell up when they get in contact with water, and you do want each seed to have room to grow.
Depending on the variety, we advice approximately 2 grams of seeds per sowing circle.
Err on the side of undersowing, as it is just a waste of seeds if half of them are pushed off the circle and don't sprout.
where can i get microgreens seeds?
We have a Microgreen Seed Starter kit available with 6 different types of microgreens to help you get started with your new Patella Crescenda sprouting kit.
Not in the EU or looking for different seeds? We made a Microgreen overview that includes links to various seed suppliers from around the globe.
Where should i place the Patella Crescenda sprouting set?
Most importantly: on a straight and level surface. If the set is not level, the water will not be distributed evenly.
Check this by filling the reservoir and placing it in the set, and then taking out the growth disks. The water should ideally reach the inner rim all around the dish.
When it comes to sunlight, the sprouting kit should be placed in a location that receives plenty of natural light but not direct sunlight, as direct sunlight can be too intense and may cause the microgreens to dry out or become scorched. Also, direct sunlight could cause a glass fire.
A windowsill that faces east or west can be a good location as it provides moderate sunlight.
That said, we have had great results with the Patella on a kitchen counter top away from direct sunlight, although it took the greens a bit longer to grow.
Ideal temperature is between 15 and 24°C (60-75°F), but even here we noticed that the greens will still grow at lower temperatures, albeit significantly slower.
Why do you advice against placing the Patella Crescenda in direct sunlight?
It's not recommended to place a reservoir filled with water in direct sunlight because it can lead to a phenomenon called "glass fire."
When sunlight passes through the water-filled glass, it can create a magnifying effect that concentrates the light into a small area, which can generate a lot of heat.
If the reservoir is placed near flammable materials, the intense heat can cause a fire.
Additionally, the concentrated heat can cause the glass to crack or break due to thermal shock, which can be dangerous if you are nearby.
Therefore, it's best to avoid placing your Patella sprouting set in direct sunlight to prevent the risk of fire or damage to the glass.
Also, it can be too intense for the tender microgreens.
Can i use the Patella Crescenda sprouting set without direct light?
Ideally the sprouting kit should be placed in a location that receives plenty of natural light but not direct sunlight.
A windowsill that faces east or west can be a good location as it provides moderate sunlight.
That said, we have had great results with the Patella on a kitchen counter top away from direct sunlight, although it took the greens a bit longer to grow.
What is the ideal temperature to grow microgreens?
Ideal temperature is between 15 and 24°C (60-75°F), but we noticed that the greens will still grow at lower temperatures, albeit significantly slower.
Do I have to fill all growth circles on the disk?
No of course not! If you only want to use a few circles or just one half of the growth disk, that's all up to you.
You still have to fill the reservoir with water though, as although there will be fewer greens growing, the water level should still be kept at the same height during the growth cycle.
Can I just use regular water to grow microgreens?
We typically use regular tap water for our products.
However, in areas where tap water has high levels of calcium or chloride, some users opt for filtered or decalcified water for optimal results.
Do I need to add fertilizer to my water?
You could, but we never do.
It is recommended for industrial hydroponic installations, but for the Patella Crescenda we advice to just grow on water alone.
Over-fertilizing can harm the plant and muddle the water, and since the growth only takes about a week, we prefer to be cautious.
How often do I need the fill the reservoir?
Only once per growth cycle should be plenty.
By the time the reservoir runs out of water, the greens are usually more than ready to be harvested.
Do I have to immediately refill the reservoir when it runs empty?
Even when the reservoir is empty, chances are there is still water in the dish, so you'll usually feel called to refill the bulb before the water really runs out.
How often do I need to clean my Patella sprouting set?
We advice to clean after each use.
To clean the glass reservoir, use dish soap or a solution of water and vinegar and swirl inside the reservoir. Then, use a bottle brush to scrub the inside.
Avoid using abrasive cleaners, as these can scratch and damage the glass.
For tough stains or build-up, a solution of baking soda and water can be used. Be sure to rinse the glass with fresh water after cleaning.
To clean the terracotta dish and base, use a soft-bristled brush or sponge and mild soap and water. Avoid using abrasive cleaners or scrubbers and rinse thoroughly with clean water.
The best way to clean the stainless steel growth disks is to use a soft, non-abrasive cloth and mild soap.
Remove stains with vinegar or baking soda and avoid using harsh chemicals or abrasive tools that can scratch the surface.
Dry thoroughly after cleaning.
For more easy care-tips and advice on getting rid of scale, check out our Care Guide
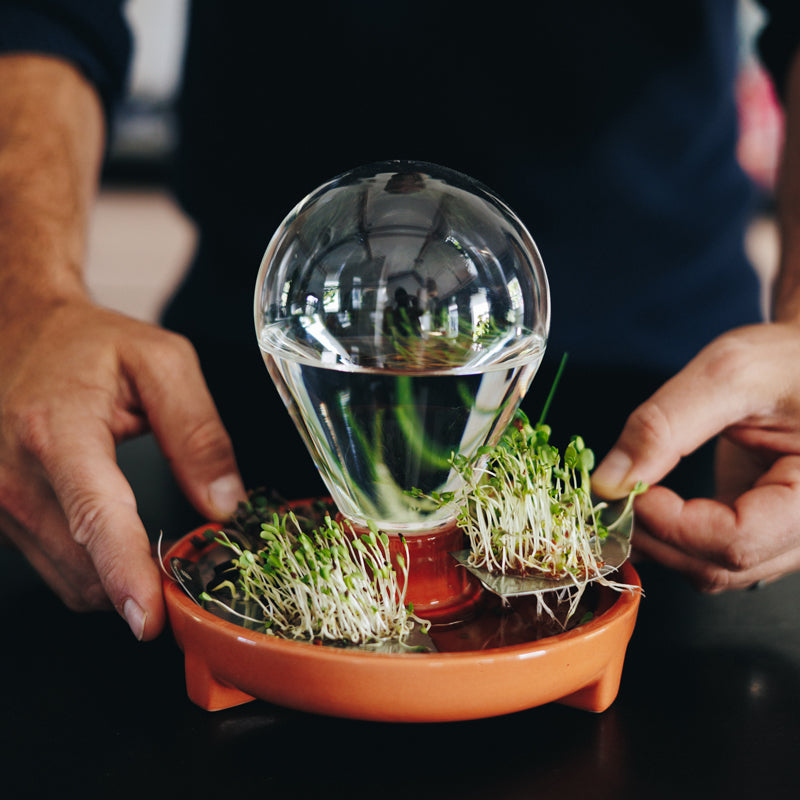
How do I harvest my microgreens?
The Patella Crescenda makes harvesting your microgreens super easy. Simply pick your greens straight from the disk.
Because of the elongated cutouts, the little plants will mostly come out with the roots in tact, meaning no residue in the water.
Because the greens are grown in clean water only, it is possible to eat them roots-and-all.
However, roots are not always the most attractive or tasty part of the microgreens, so we often snip them off with our fingers before eating the greens.
Can I eat the roots?
Because the Patella Crescenda sprouting kit allows you to grow microgreens in clean water only, it is possible to eat them roots-and-all.
However, roots are not always the most attractive or tasty part of the microgreens, so we often snip them off with our fingers before eating the greens.
Will the microgreens resprout?
They usually don't, because we pick them out of the Patella growth disks root and all.
However, it should be possible to cut off the seedlings of wheat grass above the seed, and these are supposed to regrow.
We have yet to try, because i keep forgetting to leave the seeds and roots. Will update this once we have.
How should I care for my Patella Crescenda set?
To clean the glass reservoir, use dish soap or a solution of water and vinegar and swirl inside the reservoir. Then, use a bottle brush to scrub the inside.
Avoid using abrasive cleaners, as these can scratch and damage the glass.
For tough stains or build-up, a solution of baking soda and water can be used. Be sure to rinse the glass with fresh water after cleaning.
To clean the terracotta dish and base, use a soft-bristled brush or sponge and mild soap and water. Avoid using abrasive cleaners or scrubbers and rinse thoroughly with clean water.
The best way to clean the stainless steel growth disks is to use a soft, non-abrasive cloth and mild soap.
Remove stains with vinegar or baking soda and avoid using harsh chemicals or abrasive tools that can scratch the surface.
Dry thoroughly after cleaning.
For more easy care-tips and advice on getting rid of scale, check out our Care Guide
What if I break or lose a part?
We all know things like that can happen. And personally hate it when that means we have to buy a whole new set.
That is why it is possible to re-order all components separately.
Will the color of the terracotta dish fade?
Yes, the color of terracotta can fade over time due to exposure to sunlight, water, and other environmental factors.
With prolonged exposure to sunlight, terracotta can lighten and become less vibrant in color. However, some people actually prefer the weathered and aged look of faded terracotta as it can add character and charm to the piece.
To minimize fading, it's recommended to keep terracotta away from direct sunlight and to avoid using harsh chemicals during cleaning.
Can the Patella Crescenda be used as a business gift?
Yes, definitely!
The Patella sprouting set makes a great eco-conscious business gift!
In fact, depending on the numbers, we can even look into a custom series and/or customize the packaging to fit your organization.
Get in touch with Jana to learn about the possibilities.
Can i sell the Patella Crescenda in my shop?
Yes, you can!
Read all about it here
Frequently Asked Questions
About growing microgreens
What are microgreens?
Microgreens are vegetable greens harvested just after the first leaves have developed.
Microgreens come in all sorts of shapes and colors and are packed with flavor and vitamins.
Depending on the variety, the concentration of vitamin C,vitamin K,Bèta Carotene and anti-oxidants can be up to 40 times as high as the adult plant (<source>).
Because Microgreens are eaten raw and you can harvest them fresh in house, little of the nutritional value is lost during preparation.
Why should I eat microgreens?
Well, for starters you don't have to do anything, of course... Whatever makes you happy.
But you might actually like micro greens: they come in all kinds of shapes and sizes and are high in flavor and nutrients.
Did you know the concentration of vitamins in microgreens can be up to 40 times as high as the adult plant? - Speed healthy eating in a pretty package!
Plus, growing them yourself with the Patella Crescenda means you keep control of 100% organic sprouts.
How long does it take to grow microgreens?
Depends on the variety, obviously.
But all in all you can expect your sprout to grow from seed to harvest-ready between 5-7 days.
A warm environment will speed up the growing process, whereas a cooler temperature can slow it down.
Which microgreen is best?
When it comes to taste, i guess that is each to his own, although i really like the good old garden cress.
If you ask me about the healthiest microgreen: "Among the 25 microgreens tested, red cabbage, cilantro, garnet amaranth, and green daikon radish had the highest concentrations of vitamin C, carotenoids, vitamin K, and vitamin E, respectively. In general, microgreens contained considerably higher levels of vitamins and carotenoids—about five times greater—than their mature plant counterparts" (straight from Wikipedia)
Also, don't grow microgreens froms seeds of the nightshade family: tomatoes, eggplant etc, as those plants are toxic.
Are all seedlings edible?
NO! (Good question!)
Be careful with plants of the nightshade family: tomatoes, eggplant etc, as they are pretty toxic.
Can you hit me up with some recipes?
Working on it!
Are microgreen seeds expensive?
The cost of microgreen seeds varies depending on the type of seeds, the quantity purchased, and the supplier.
While some specialty varieties of microgreen seeds can be more expensive, many common varieties are relatively inexpensive and can yield a large quantity of microgreens.
It is also possible to cultivate your own seeds by moving some of your microgreens to soil, allowing them to grow and flower, then harvest the seeds and save them for future use.
What is the best time to harvest microgreens?
It is important to harvest your microgreens at the right time to get the most flavor and nutrition.
The ideal time to harvest your microgreens will depend on the specific type of microgreen you are growing.
Generally, microgreens are ready to harvest when they have grown to a height of 2.5-7.5 cm (1-3 inches).
If you wait too long to harvest your microgreens, they may become too tall and develop a bitter taste.
It is best to harvest them when they have reached their full size but before they begin to produce true leaves. You can determine the optimal harvesting time by monitoring the growth of your microgreens and tasting them to find the desired flavor.
It is never too late to harvest your microgreens, but it is important to do so before they become too tall and the flavor becomes unpleasant.
What is the best way to store microgreens after harvesting?
We usually eat the microgreens straight from the Patella kit, but it is also possible to pick and store them.
To store harvested hydroponic microgreens, follow these steps:
- Rinse the harvested microgreens with cold water to remove any dirt, debris or fertilizer residue.
- Gently shake off excess water and pat dry with paper towels.
- Line a plastic container or a sealable plastic bag with a paper towel and place the microgreens inside.
- Seal the container or bag and store it in the refrigerator.
- Depending on the type of microgreens, they can last for up to a week or more when stored properly.
- Avoid storing them in a wet container or bag, as excess moisture can cause the microgreens to spoil quickly.
Are hydroponic microgreens more nutritious than soil-grown microgreens?
There is some evidence to suggest that hydroponic microgreens may be more nutritious than soil-grown microgreens.
In hydroponic systems, the nutrients are delivered directly to the plant roots, which can result in faster growth and higher nutrient uptake.
However, the overall nutrient content of the microgreens can vary depending on the specific growing conditions and the type of plant being grown.
It is generally recommended to choose a variety of different types of microgreens to ensure a diverse range of nutrients in your diet.
what does the UN say about microgreens?
The United Nations has recognized the importance of microgreens as a sustainable and nutritious food source.
Microgreens were specifically mentioned as a promising and innovative way to increase access to fresh, nutritious food in urban areas and other environments with limited space for traditional agriculture.
The UN also highlighted the potential of microgreens to contribute to food security and poverty reduction, as they can be grown locally and year-round with minimal resources.
What are the best microgreens to eat to boost my immune system?
Microgreens, in general, are packed with nutrients and can provide health benefits, including boosting the immune system.
Some microgreens that are particularly high in antioxidants and immune-boosting compounds include:
- Broccoli microgreens
- Kale microgreens
- Red cabbage microgreens
- Arugula microgreens
- Radish microgreens
- Cilantro microgreens
- Beet microgreens
- Wheatgrass microgreens
- Sunflower microgreens
- Pea shoot microgreens
It's important to note that while microgreens can be a healthy addition to a diet, they shouldn't be relied upon as the sole source of nutrition.
A well-rounded diet that includes a variety of fruits, vegetables, whole grains, and lean proteins is still essential for overall health and wellbeing.
Which microgreens are the best source of vitamin A?
Vitamin A helps maintain healthy vision, skin, and immune function.
Some microgreens that are a good source of vitamin A include:
- Carrot microgreens
- Red cabbage microgreens
- Kale microgreens
- Mustard microgreens
- Beet microgreens
- Swiss chard microgreens
- Collard microgreens
- Arugula microgreens
These microgreens are high in beta-carotene, which is converted to vitamin A in the body.
Which microgreens are the best source of vitamin B?
B vitamins are important for energy metabolism, brain function, and healthy skin and eyes.
Different microgreens have varying amounts of vitamin B, but some of the best sources include:
- Broccoli microgreens: high in vitamin B6 and folate
- Pea shoots: high in vitamin B1, B2, and B3
- Sunflower microgreens: high in vitamin B6 and folate
- Radish microgreens: high in vitamin B6 and folate
- Wheatgrass: high in vitamin B6 and B12
It's important to note that the nutrient content of microgreens can vary depending on growing conditions, so it's always a good idea to eat a variety of different microgreens to get a range of nutrients.
Which microgreens are the best source of vitamin C?
Vitamin C is an antioxidant that helps protect against cell damage and promotes healthy skin and immune function.
Some of the best microgreens to eat to get vitamin C are:
- Broccoli microgreens
- Kale microgreens
- Pea microgreens
- Radish microgreens
- Red cabbage microgreens
- Sunflower microgreens
- Wheatgrass microgreens.
It's important to note that microgreens are not a substitute for a balanced diet and a healthy lifestyle.
Which microgreens are the best source of vitamin E?
Microgreens are generally a good source of vitamin E, which is an antioxidant that helps protect cells from damage.
However, some microgreens are particularly high in vitamin E, including:
- Sunflower microgreens
- Broccoli microgreens
- Radish microgreens
- Pea microgreens
- Wheatgrass microgreens
Keep in mind that the exact nutrient content of microgreens can vary depending on the growing conditions and other factors.
Which microgreens are the best source of vitamin K?
Microgreens are a good source of vitamin K, which is important for blood clotting and bone health.
Here are some of the best microgreens to eat for vitamin K:
- Kale microgreens
- Broccoli microgreens
- Red cabbage microgreens
- Mustard microgreens
- Amaranth microgreens
- Beet microgreens
- Swiss chard microgreens
- Cilantro microgreens
These microgreens are not only high in vitamin K but also have many other nutrients and health benefits.
Which microgreens can help battle inflammation?
Many microgreens are known to have anti-inflammatory properties due to the presence of various phytochemicals, such as polyphenols, flavonoids, carotenoids, and other antioxidants.
Some of the microgreens that are particularly high in anti-inflammatory compounds include:
- Broccoli microgreens
- Red cabbage microgreens
- Radish microgreens
- Cilantro microgreens
- Basil microgreens
- Arugula microgreens
- Mustard microgreens
- Wheatgrass microgreens
- Kale microgreens
- Amaranth microgreens
Incorporating these microgreens into your diet may help to reduce inflammation and promote overall health and wellness.
can I move hydroponically grown microgreens to soil?
Yes, you can move hydroponically grown microgreens to soil. However, the process can be a bit tricky and may require some extra care to ensure successful transplantation. Here are some tips to help you move your microgreens to soil:
- Choose the right soil: Make sure you use a high-quality soil mix that is loose and well-draining. A soil mix designed specifically for seedlings is a good option.
- Transplant at the right time: Wait until your microgreens have developed a good root system before transplanting. This will usually take around 10-14 days.
- Be gentle: When removing your microgreens from the growth disks, be careful not to damage the roots or stems. Use a small spoon or spatula to lift the plants out of the water.
- Prepare the soil: Fill your planting container with soil and create small holes where you will place your microgreens.
- Plant your microgreens: Carefully place your microgreens in the holes you created in the soil. Gently press the soil around the roots to secure them in place.
- Water and care for your plants: Water your transplanted microgreens thoroughly and place them in a bright, but not direct, light. Keep the soil moist and make sure to fertilize regularly.
Remember that moving hydroponically grown microgreens to soil can be challenging, and there is always a risk of damaging or losing your plants. However, with the right care and attention, it is possible to successfully transplant your microgreens and continue to grow them in soil.
what is the best season to grow microgreens indoors?
One of the advantages of growing microgreens with your Patella Crescenda is that they can be grown year-round, regardless of the season!
is growing microgreens indoors beneficial for your living environment?
Yes, growing microgreens indoors can be beneficial for your living environment in a number of ways.
Firstly, microgreens can help purify the air by removing pollutants and harmful chemicals.
They can also help regulate humidity levels in your home, which can prevent the growth of mold and other allergens.
Additionally, growing microgreens indoors can provide a source of fresh, nutritious produce, which can help improve your overall health and wellbeing.
Finally, tending to indoor plants and microgreens can have a calming effect, reducing stress levels and promoting a more relaxed living environment.
How do microgreens contribute to a resilient and future-proof world?
Microgreens can contribute to a more sustainable and future-proof world in several ways:
- Efficient use of resources: Microgreens can be grown with minimal space, water, and fertilizer, making them a more sustainable alternative to traditional agriculture.
- Reduced food waste: Microgreens have a shorter growing cycle than mature plants, so they can be harvested and sold more quickly, reducing the risk of spoilage and waste.
- Local food production: Growing microgreens can be done year-round and in urban areas, allowing for local food production and reducing the carbon footprint associated with long-distance transportation.
- Health benefits: Microgreens are packed with nutrients, making them a healthy addition to any diet. They can be used to supplement meals, adding flavor and nutrition to a range of dishes.
Overall, incorporating microgreens into our diets and supporting local, sustainable food production can help build a more resilient and future-proof food system.
Why is eating microgreens sustainable?
Eating microgreens is considered sustainable for several reasons.
Firstly, microgreens can be grown year-round in a small space, without the need for large amounts of water, fertilizer, or pesticides. This means that they can be grown locally, reducing transportation emissions and the carbon footprint associated with the production and distribution of food.
Additionally, microgreens are a highly efficient crop, as they can produce a large amount of nutritious food in a small area. They also have a quick growth cycle, typically taking only a few weeks to mature, which means that they can be produced and harvested more frequently than many other crops.
Finally, microgreens are highly nutritious, containing high levels of vitamins, minerals, and antioxidants. This means that they can provide a sustainable and healthy source of food for people, which is important for promoting overall health and wellbeing.